When choosing arcade buttons, one key consideration is the mounting style: snap-in vs screw-in. The difference isn’t just how you install them – it can determine whether the buttons will even fit in your arcade stick or cabinet. In this article, we’ll explain snap-in vs screw-in buttons, then provide a compatibility matrix for popular fightsticks and cabinets. You’ll learn which sticks support which type, plus tips on avoiding clearance issues and “anti-spin” tricks for wood panels.
Snap-In vs Screw-In: What’s the Difference?
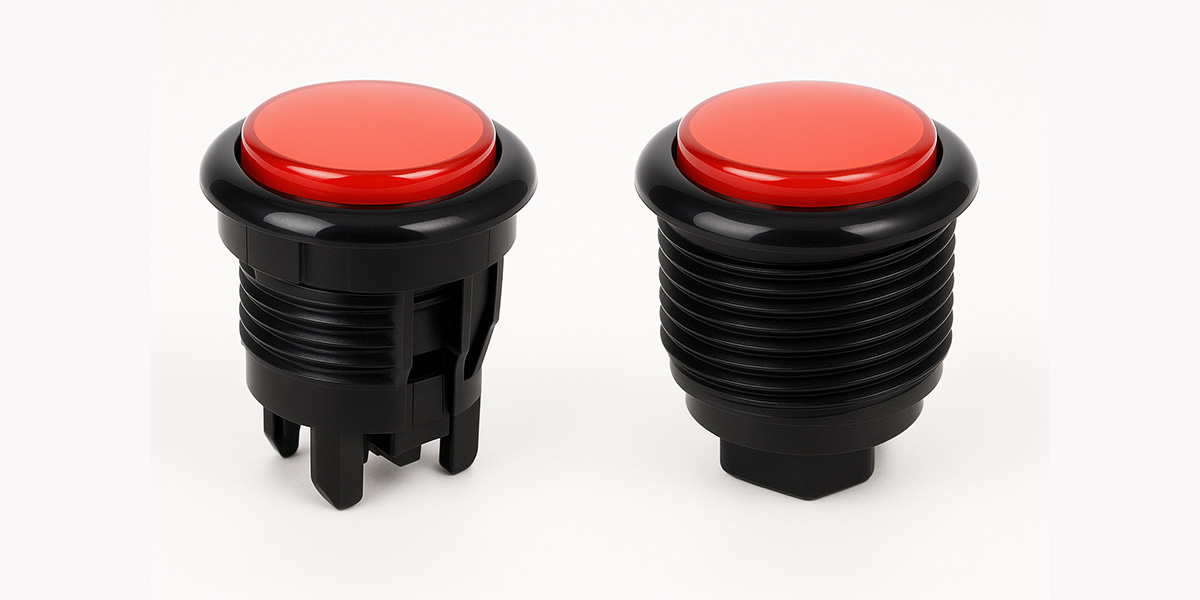
Snap-in buttons have small plastic tabs on the sides of the button housing that snap into the panel hole. You simply push the button into the hole, and the springy tabs click outward underneath the panel to hold it in place. Snap-ins are quick to install and remove (in theory – tabs can be a bit finicky), and they are designed for thin panels (more on thickness below). For example, the popular Sanwa OBSF-30 is a snap-in button found in many commercial fightsticks. Snap-in buttons typically have flat rims and are meant for metal or plastic panels about 2-4mm thick.
Screw-in buttons have a threaded barrel and come with a separate plastic nut. You insert the button from the top of the panel, then screw the nut on from underneath to secure it. A prime example is the Seimitsu PS-14-KN 30mm button, which uses a screw-on nut. Screw-ins can accommodate thicker panel materials because the nut can be tightened down on a broader range of thicknesses. These are often used in custom wooden cabinets or thicker control panels. The nut also allows you to secure the button firmly so it won’t budge or rotate.
Functionally, both types do the same job – use whichever fits your build. Snap-ins are generally a bit easier and faster to swap, which is why modders love them for metal fightsticks. Screw-ins take a bit longer (you have to fully unscrew each nut to remove a button), but in practice it’s just a difference of a couple of minutes. One thing to note: snap-in buttons are usually a hair cheaper than their screw-in counterparts (since there’s no extra nut part). And not every model is available in both styles; e.g., certain special edition buttons might only come as snap-ins.
Panel thickness compatibility: Snap-ins are intended for thin panels. In fact, the maximum panel thickness a snap-in can reliably grab onto is about 3mm (1/8″). Anything thicker, and the tabs won’t fully engage – the button will sit loosely or pop out. Screw-ins, on the other hand, often support panel thicknesses up to about 8mm or more (Seimitsu and Sanwa screw-ins generally can clamp around 6mm comfortably, and some longer ones up to ~9-10mm). That’s why if you have a thick wood control panel (like the 3/4″ MDF used in many arcade cabinet builds), you must use screw-in buttons or American-style buttons. For example, Arcade1Up cabinet modders found that Sanwa snap-ins wouldn’t stay put in the stock 1/2″ MDF panel – the solution was to use screw-in Sanwa or Seimitsu buttons, which have longer threaded barrels for that application.
Mounting differences: Snap-in tabs can occasionally break if you’re not gentle (especially if repeatedly swapped); many veterans use a flat tool or dedicated button puller to compress tabs during removal to avoid snapping them. Screw-ins require enough space to turn the nut. If buttons are very close together, the nuts might actually touch – meaning you have to tighten them in a specific order or use a slim profile nut. Interestingly, Seimitsu updated their screwbutton design to a new “black nut” that’s taller and more compact specifically to navigate tighter button layouts. These newer nuts also have small bumps that help you grip and tighten, and even help the nut bite into the panel slightly to prevent loosening.
Compatibility Matrix: Which Sticks Support Snap or Screw?
Different arcade sticks and cabinets have various internal layouts and panel types, affecting whether snap-ins or screw-ins (or both) are suitable. Below is a compatibility rundown for popular models:
Mad Catz TE/TE2 series
Metal top panel (~2mm) with plexi artwork. Snap-in: Yes (stock TE buttons are Sanwa OBSF-30 snap-ins). Screw-in: Yes, fits in most positions. However, on the TE2/TE2+ it’s reported that one of the eight button holes is very close to a support pillar, allowing only a snap-in there (users found 7 screw-ins fit, 1 had to remain snap-in). Standard Vewlix spacing (36mm) means Sanwa OBSN screw-in nuts will just fit side by side. No major issues aside from that one corner button on TE2.
Hori Real Arcade Pro (RAP) series
Thin metal panel. Snap-in: Yes (Hori’s stock buttons like Kuro/Hayabusa are snap-in). Screw-in: Generally yes – many builders have put Seimitsu screw-ins in RAP sticks without problems. The internal casing is spacious enough on most RAP models. One exception: the Hori Fighting Edge (PS4 version) has some extra PCB and LED panel inside – users report you can only get about 5 or 6 screw-ins in that stick; the remaining 2-3 buttons have to be snap-ins due to clearance issues at the far right where the touch panel is.
Qanba Obsidian/Dragon
Metal panel. Snap-in: Yes (these come stock with Sanwa OBSF-30 snap-ins). Screw-in: Yes, both sticks have roomy interiors. The Dragon in particular is huge and easily fits screw-in nuts. The Obsidian can use screw-ins as well; its layout is similar to a TE2. No known restrictions beyond possibly needing to remove the internal LED daughterboard when installing, but that’s minor. Newer Qanba models like the Obsidian 2 explicitly use Sanwa snap-ins stock, but you could swap to screw-ins if desired (the spec even includes Sanwa OBSF, which are snap, but OBSN would fit fine).
Razer Atrox (Xbox) and Panthera (PS4)
Metal panel with easy-access flip top. Snap-in: Yes (stock Sanwa OBSF-30). Screw-in: Yes, they have standard layouts. The Razer Panthera is basically designed like a Mad Catz TE internally, so screw-ins are not a problem. The Panthera EVO (which had Razer’s own buttons) can also fit standard 30mm buttons of either type if you mod it, since the panel didn’t change significantly.
Mayflash F500/F300 (and clones like Venom, PXN)
These are budget sticks with metal top panels ~1.5mm and plastic underneath. Snap-in: Yes, they come with snap-in style clones stock. Screw-in: Mostly yes – the main issue is space. The Mayflash F500, for example, can fit screw-ins but a couple of the button holes are very close to the case wall, meaning the nut might be hard to turn. It’s doable with pliers or by partially screwing the nut on before inserting the button. Generally, you can mod these with screw-in Sanwas or Seimitsus (tons of people do). Just take your time in tight spots.
EightArc/FightStick PRO
(EightArc and Qanba Q4RAF are similar inside to Mad Catz TE). Snap-in: Yes (stock Sanwa snap-ins). Screw-in: Yes, similar to TE – most will fit, maybe one near the cable door might be snug.
Custom wooden cases / hitbox DIY builds
If you have a thick wooden panel (>5mm), snap-ins will not secure properly. You should use screw-in buttons. For wood panels around 1/2″ thick (12mm), even screw-in Japanese buttons may barely reach – you might need to recess (route) the underside to thin it to ~8mm or less where the buttons go. Alternatively, use American style concave buttons which are designed for thick panels (they have long threaded barrels ~1.5″). For thin plywood or hitbox cases around 3mm with an acrylic top, snap-ins are fine. If using snap-ins in wood that’s borderline thickness, one trick is to run a bead of hot glue around the underside to keep the tabs from potentially popping out during play.
Arcade Cabinets (e.g. Arcade1Up and full-size)
Classic cabinets with thick panels (3/4″ MDF) originally used Happ-style screw-ins. If you want to use Sanwa or Seimitsu buttons in something like an Arcade1Up machine, you must use screw-in variants. Arcade1Up modders found that the Japanese screw-ins fit the panel thickness, but sometimes the diameter of the 30mm hole was slightly off (Arcade1Up holes are ~1.2″ or so). Minor filing can enlarge the hole to exactly 30mm. Once that’s done, screw-in buttons work great in those cabs. Snap-ins simply won’t lock on such a thick board.
Here is a quick reference matrix summarizing the above:
| Fight Stick / Panel | Snap-In Buttons | Screw-In Buttons | Notes |
|---|---|---|---|
| Mad Catz TE/TE2 series | Yes (stock) | Yes (except 1 on TE2) | TE2: one hole near support = snap-in only. |
| Hori RAP (VX,4,Kai,etc) | Yes (stock) | Yes (most models) | Fighting Edge PS4: only 5-6 screw-ins fit. |
| Qanba Obsidian/Dragon | Yes (stock) | Yes | Plenty of internal clearance. |
| Razer Atrox/ Panthera | Yes (stock) | Yes | Similar to Mad Catz layout inside. |
| Mayflash F500/F300, Venom | Yes (stock clones) | Yes (tight fit) | Nuts fit with careful tightening. |
| Qanba Drone (Budget) | Yes (stock clones) | Yes (snug) | Smaller case, but screw-ins doable. |
| Custom Wooden Panel (>5mm) | No (too thick) | Yes | May need to recess holes to <8mm thickness. |
| Arcade1Up 3/4″ cabinet | No | Yes | Must use threaded (or Happ style). |
Note: Virtually any fightstick that comes with Sanwa OBSF (snap-ins) can be converted to screw-in OBSN or Seimitsu, if there’s physical space for the nut. The main obstacles are typically plastic support walls, turbo/LED PCBs, or cable harnesses that crowd the button area in some designs. Always open your stick and examine the button spacing if you plan to switch to screw-ins. In cases where only one or two buttons are obstructed, you can mix and match (e.g. use screw-ins for 6 buttons and leave 2 as snap-ins where space is tight).
Clearance Tips and Anti-Spin Tricks
Clearance for screw-in nuts: If your button holes are the standard 36mm apart (common in Vewlix 8-button layouts), screw-in nuts will fit, but sometimes just barely. Older Sanwa nuts are quite large in diameter. If you find nuts touching each other, you can sand or file a flat edge on the sides of the nuts to give a bit more clearance – or use the newer Seimitsu low-profile nuts which are smaller in diameter. Another trick: tighten adjacent nuts one at a time by rotating each a quarter turn alternately – this can inch them down even if they’re a tight fit against each other.
Snap-in rotation issues: Snap-in buttons have tabs that prevent them from rotating under normal circumstances, as long as they’re tightly seated. However, in wood or acrylic panels that are at the upper thickness limit, the tabs might not dig in as deeply, so a snap-in could potentially spin if the fit is loose. To solve this, you can apply a tiny drop of hot glue or even a strip of electrical tape around the button housing to create more friction. This will hold a snap-in firmly and prevent rotation or popping out during heavy play. The glue is easily removable if you need to swap the button later.
Screw-in anti-spin: A properly tightened screw-in usually doesn’t rotate – the tension of the nut holds it. But wood panels can compress slightly over time, and vibration might loosen the nut. One anti-spin trick for screw-ins in wood is to use a lock washer (a split ring or tooth washer) between the nut and the wood. As you tighten, the lock washer bites in and helps prevent the nut from backing off. Additionally, some screw-in buttons (like the Seimitsu with new black rings) have those small bumps on the nut that act like teeth against the panel. If yours doesn’t, you could even add a tiny dab of removable threadlocker (Loctite Blue) on the threads – this will keep the nut secure but still allow you to intentionally remove it with effort.
Avoid over-tightening: It’s tempting to crank down a screw-in nut hard, but be gentle – they are plastic and can crack. Snug is usually enough. If you hear creaking as you turn, stop. A moderate hand-tight plus maybe an extra 1/8 turn with pliers (using a cloth to avoid marring the plastic) is plenty. Over-tightening can also warp plastic control panels or plexi covers.
Special cases – button rub: In a few sticks (notably some older Hori models), the button holes have little notches or “tabs” to match proprietary button designs and prevent spinning. If you put a different brand button in, those notches might interfere slightly. You can sand the notch or the new button’s side. Also, some screw-in button nuts have a notch that is meant to align with a hole in the panel to prevent rotation (common in some industrial buttons). Most fightsticks don’t use that, but if you see a small nub on a nut, ensure it’s not sitting on a ridge – if so, trim it off or reposition it.
Troubleshooting Examples
Scenario 1
You try to put Sanwa OBSF-30 snap-ins into an Arcade1Up and they won’t lock. The panel is ~12mm MDF – too thick for snap tabs.
Solution: Use Sanwa OBSN-30 screw-in buttons (or Happ style) which are designed for thick panels. Lightly file the holes if needed to fit the 30mm diameter, then tighten the nut.
Scenario 2
You want to swap the buttons in your Hori RAP4 for a different color, and you only have screw-in buttons on hand. They install fine except the last one, which hits the case wall and won’t tighten straight.
Solution: For that tight spot, you can either Dremel a flat on the nut, or use one of your original snap-in buttons in just that hole. Mixing one snap-in among screw-ins is perfectly okay.
Scenario 3
After playing your custom wooden fightstick for a few months, you notice one button has rotated a few degrees and feels loose. It’s a screw-in on a 1/2″ wooden panel.
Solution: Open it up, tighten the nut back down. Add a lock washer or a little drop of threadlocker on the threads for that nut. That should keep it from loosening again under heavy use.
In summary, snap-in vs screw-in is mostly about matching the button to your build’s physical requirements. Always consider your panel’s thickness and internal space. For slim metal panels (most retail sticks): snap-ins are quick and easy, but screw-ins work too if space allows. For thick or custom builds: screw-ins are your go-to. By knowing the nuances (and using our matrix as a guide), you can avoid the frustration of ordering buttons that end up not fitting your case.
For a broader view, check our buyer guide on arcade buttons.
FAQ
Q: Do screw-in buttons feel different from snap-ins?
A: No, not inherently. “Snap-in” and “screw-in” just describe the mounting method. The button’s feel is determined by its brand/model (spring strength, microswitch, plunger design), not whether it uses tabs or a nut. For example, a Sanwa OBSF-30 (snap-in) and Sanwa OBSN-30 (screw-in) feel identical to press – the only difference is the OBSN has a threaded housing. So choose based on mounting needs, not feel. One small note: if a screw-in nut is over-tightened on a thin plastic panel, it could slightly warp the panel, possibly affecting feel – but that’s an edge case to avoid.
Q: My snap-in buttons keep popping out of my wooden control panel. Any fixes short of buying new buttons?
A: This is a common issue if the wood is too thick. One hacky fix: if the panel’s underside is accessible, use a strong adhesive like epoxy or even screws to attach a thin sheet metal or acrylic layer under the button area, effectively making the panel “thinner” where the clips grab. Alternatively, hot glue around the button as mentioned can hold it in. But honestly, the best fix is to switch to screw-ins for wood. You could also carefully rout or drill from underneath each hole to create a recess, thinning the wood to ~3mm at the clip points – tedious but effective if you have the tools.
Q: Can I convert my screw-in buttons to snap-in (or vice versa) by buying parts?
A: Not exactly. The housings are different. Snap-in buttons have those molded tabs on the body; screw-ins have threading. You can’t just add a nut to a snap-in housing or snap tabs onto a screw housing. However, many button series offer both versions. For example, Sanwa OBSF (snap) and OBSN (screw) use the same plunger and microswitch components – only the housing differs. In theory, if you had spare housings, you could swap the plungers/switch between them. But it’s easier to just get the correct type. The one “conversion” scenario is if you have snap-ins and your panel absolutely needs screw-ins: you might be able to secure a snap-in by gluing it or by using a 3D-printed nut under it, but that’s a MacGyver move. It’s usually better to use the proper button format for your panel.
Q: Do screw-in buttons ever loosen on their own?
A: It’s rare, but can happen, especially in wood panels that might compress. Vibration from gameplay is low, but repeated presses can wiggle things. If you frequently carry your stick around, jostling can also loosen nuts. The solutions we gave – lock washers, threadlocker, etc. – will prevent this. In metal panels, nuts usually stay put due to the firm surface. Periodically opening your stick to check connections is a good habit, and you can just hand-tighten any nuts if needed.
Q: I have an older fightstick (or DIY box) where the 30mm holes have little locator cut-outs. Will new buttons fit?
A: Many older or cheaper sticks have notches, often to match tabs on the original buttons (sometimes to prevent spinning). Most Japanese buttons don’t use those notches. If the notch is small, a new 30mm button will still cover it and sit fine. If the notch prevents a screw-in nut from sitting flat, you may need to file that area. Or if a snap-in’s tab falls right where a notch is, it might not hold well – rotating the button a few degrees can avoid alignment with the notch in that case. Worst case, fill the notch with a bit of epoxy or wood filler and redrill the circle to smooth it out.
Sources
- Saturn Forge. “The Big Arcade Stick / Fightstick Pushbutton Guide” saturnforge.com
- Focus Attack Support. “How Thick of a Control Panel Can a Snap-in Button Fit Into?” (May 26, 2016) – max 3.175mm for snap-ins support.focusattack.com
- Focus Attack Support. “Arcade1Up: Can I install Sanwa or Seimitsu pushbuttons?” (Dec 26, 2018) – use screw-in on thick panels support.focusattack.com
- Reddit r/fightsticks. “Screw-in Buttons – Share your experience” (Oct 2020) – user data on TE2 (7 of 8 screw-ins fit) and Hori FE (5-6 fit) reddit.com
- Qanba USA Product Description- Obsidian 2 qanbausa.com
- Shmups Forum. “Hori RAP questions” – confirms screw-ins work in RAP sticks shmups.system11.org
- Focus Attack Product Description – Seimitsu PS-14-KN. New black nut design for tight layouts focusattack.com
- ArcadeControls Forum. routing wood to support Sanwa OBSN-30s – is this enough support? forum.arcadecontrols.com


